
Black Box Terrain

This is absolutely the simplest first project I could come up with, and it has a huge impact on gameplay. Consider the difference between this battle map:

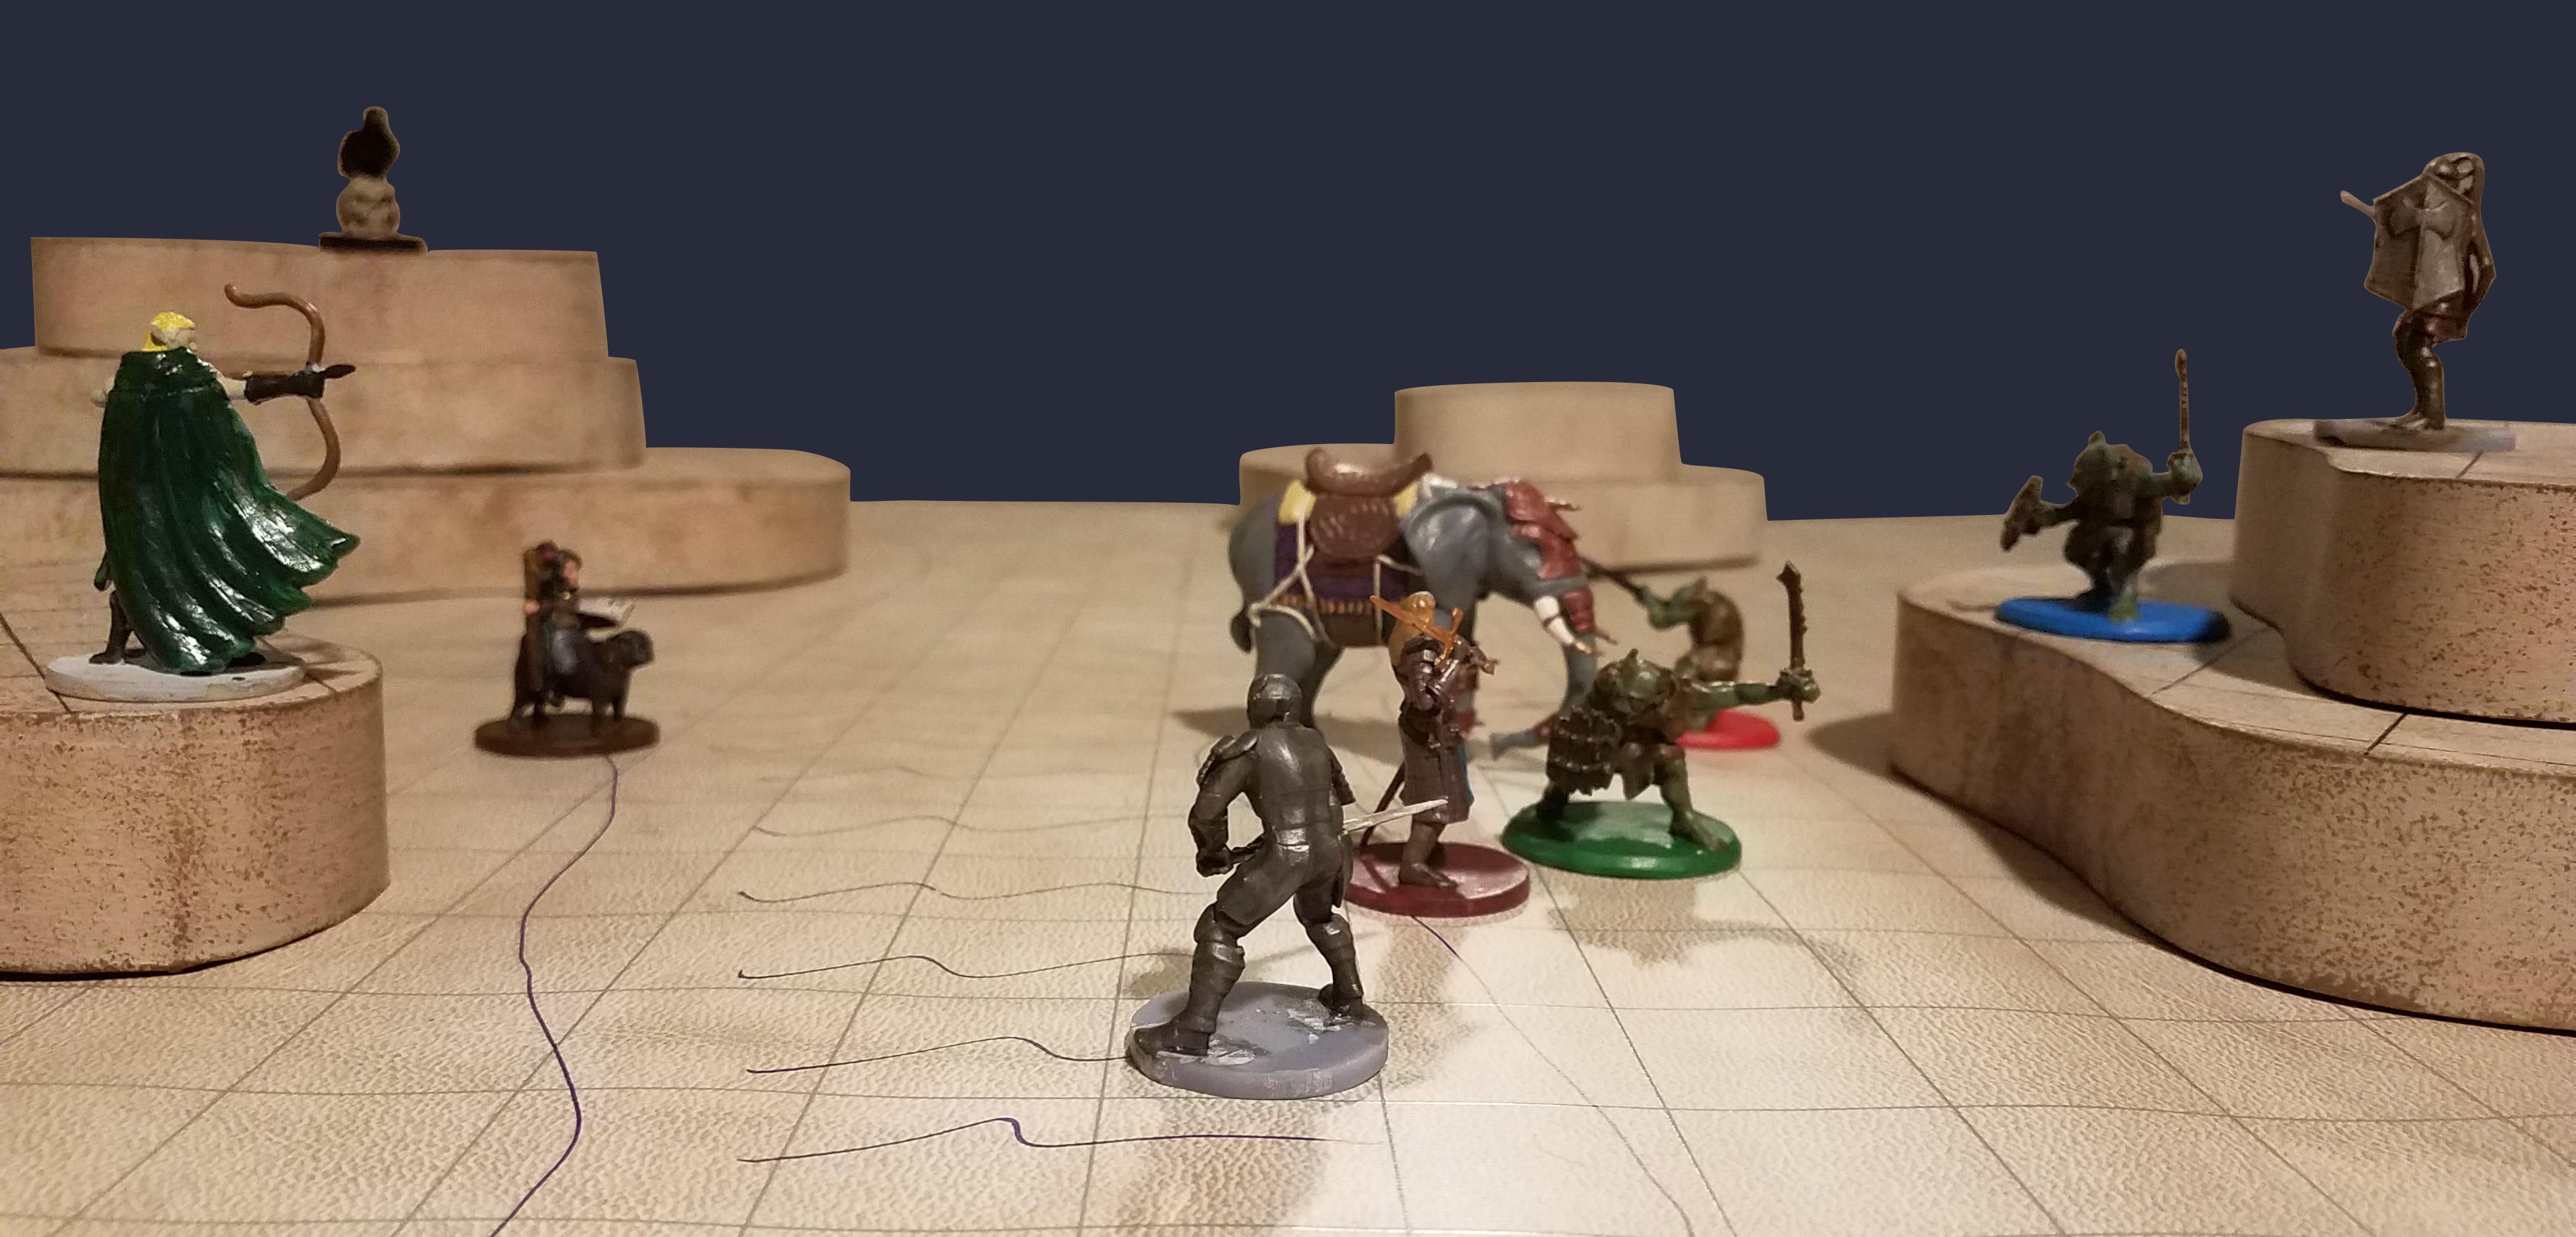
And this one:

I think I mentioned before that my drawing skills are… subpar? And unfortunately, until recently if we were playing together, the first map would have been considered an actually pretty good one by my standards - it has hills, trees, and difficult terrain. All tactically useful. Hypothetically. But how do you hide behind a tree that’s squiggles on paper? How do you stand on top of a hill that’s a curve? Welllll…. you probably don’t.
And the result of not using that terrain is significant. I’ve felt this too many times - had my players tell me the same thing. “Battle is kind of a slog, honestly, like it takes forever and all we do is run up and hit things.” It’s hard, right, to think of things in three dimensions when the map is gesturing vaguely towards two, and it leads to (sorry) one-dimensional battle where you just run up and hit things.
So I did what any self-respecting DM does when the party doesn’t look like they’re having any fun, and I made something up.
I spent a lot of time in the last newsletter talking about black box theater - give that a read for some background - and came up with an idea for black box terrain, largely inspired by topography maps. Each brown squiggle below represents an elevation change of some amount (sometimes 10, 20, 100 feet, depending on what you’re looking at) and gives you an approximate shape of the feature. Areas where lines are closer together - like right underneath the “Stowe” label - represent steep slopes or cliff faces. Places where they’re further apart, like in the Lower Village, represent gentler slopes.

Because I have a knack for procrastinating so long it becomes forethought, when I found myself contemplating this project, I also happened to have a bunch of recycling piled up in my kitchen. Hooray! Two problems with the same solution - make a fun thing.
I used the various cereal, cracker, and frozen pizza boxes for this project, not corrugated cardboard. I was afraid that the corrugation would show through the paint in the final product, and putting smooth curves into corrugated cardboard is possible, but a PITA. If anyone tries and prefers corrugated cardboard, let me know!
Black Box Terrain

Supplies:
A bunch of empty cereal boxes (or similar)
Painters tape or masking tape
A ruler
Scissors
Paint
Mod podge or similar
A pencil
Step 1: Break down your boxes. You really want the large, flat pieces.


Step 2: Measure and cut out 1-inch strips. These will form the sides of our terrain, and the scaffolding beneath. You do want to be pretty careful about measuring and cutting these, as uneven cuts will lead to gaps and slightly unbalance the final product.


Step 3: Mark and cut out your terrain shape. Try to make it amorphous, but don’t add too many sharp curves. You can use larger boxes (like frozen pizzas) for bigger surfaces. Also, if you’re clever, you can let the damage inherent to literal garbage influence your shapes!

Step 4: Starting at a relatively featureless area (not on a pronounced curve), tape a 1-inch cardboard strip to the edge of your surface piece, making sure to keep the printed sides together on the inside. Use your fingernail to push the tape all the way into the corner for better adhesion. Working in small sections, tape the strip nice and flush to the edge of the surface piece, and keep it as close to a 90-degree angle as you can.


Go absolutely hog-wild with the tape. Lots of smaller pieces are more effective than fewer, large pieces. For sharp bends, pre-bend the cardboard strip, otherwise it can spring back on you. You may need to use a few pieces on the outside for certain curves, but I don’t like for those to be permanent because they show under the paint. More on this later.
You will need to join 2 or more cardboard strips to go around the larger forms. Use a piece of tape about 2 inches long to carefully join them. I do advise you use a torn, rather than cut piece of tape for this, as it’s easier to hide an uneven line behind paint than it is to disguise a straight line.
When you get back to your starting point, carefully measure and cut off the excess, then use a piece of tape to secure the two strips of cardboard together. Make sure your tape stays nice and smooth on the outside - work slowly! This is easier to do on a flat or gentle curve.
Step 5: More tape! This time, cut some of those 1-inch strips into shorter pieces, which we’ll affix to the underside, and attach to the walls and underside of the surface. These will help support our structure, and reduce warping when we paint.

Step 6: Prep the surface. You’re pretty likely to have some gaps between the vertical strips and the terrain surface where the tape didn’t keep it together well. Grab some mod podge or other craft glue, and just kinda smush it in the cracks.

You’ll probably need to revisit some areas three or four times, as the glue will shrink away from the hole as it dries, but with patience you can bring it together. If it doesn’t seem to be working, check your tape job. Is it dripping down the inside? Seal that up with another bit of tape, and try again. Go ahead and cover the whole seam with a couple of thin layers of glue as well, to back up the tape. Keep your glue thin and even - we’re getting towards finishing now, and sloppiness here will be hard to clean up later.
While you’re at it, consider removing those pieces of tape from the top. Otherwise, once you paint, you’ll end up with an uneven surface like below. I didn’t like this, so on subsequent pieces, I glued up the outside except for where there was tape, let it set fully, and then removed the tape and glued over the space left. This kept the attachments secure, but left me a nice clean surface to paint on!

Step 7: Paint! We’re in the home stretch. I mixed up a beige-y color to match my wet-erase battle map, and added a generous helping of mod podge to the paint to help strengthen the surface. Apply two or three thin coats, letting the paint fully dry in between, and you’ll have a great surface. You can leave it here, or take it a step further and sponge on a darker color to give it the “printer paper crinkled and then soaked in tea” look.


Step 8: Gridlines. I found it easiest to use a mechanical pencil to draw the lines, and a square or right-angle tool to lay out the measurements. I also started my first line just below the (somewhat arbitrary) center of the shape so that the grid didn’t look funky. Go slow, measure carefully, and draw boldly!

Step 9: Finishing! DAB - do NOT paint - some mod-podge over the whole surface of your terrain. Paint strokes will smudge your beautiful, delicate gridlines. Use that sponge you found earlier. After your first coat dries, you can go ahead and paint on a second coat. This will seal in your paint, and further strengthen the joints.
Black Box Terrain: Evaluation
Immersion: 6/10 - definitely gives your topography a boost, and saves you from kludgy narration
Interaction: 10/10 - watch your players immediately try to take the high ground
Entertainment: 8/10 - suddenly range has meaning!
Overall Impact: 7.5/10
Durability: i mean, it’s garbage, but it holds up pretty well to most use. Don’t spill on it.
Repeatability: super simple, and you can use different colors if you want
Cost: lol

Final thoughts
I’m pretty pleased with this first experiment. For an absolutely dirt cheap project, it has a lot of impact on the game, and took probably… two afternoons? to make six or seven pieces - and a lot of that was waiting for paint to dry. I have a couple of thoughts on how I might take this project a step further, so I’ll update this when I figure out whether or not it was a good idea.

Love this idea! ❤️